

I have had requests to post how I made my flat bottom woven purses. I have played with the design ideas a lot and have not come up with the "real" way to do it, I have insight into the proper way it's done from pictures that embeadke at Candy Wrapper Crafts, has sent me of a purse he purchased.
Embeadke has been helpful in sharing his procedure of using storage tape to coat paper with for a more durable and water resistant end product when using magazine pages or other paper that is not coated already, he also introduced me to the idea of using larger pieces of paper, more exactly he suggusted a dollar bill sized piece.
I viewed several pictures he sent that show me the way his purchased hand bag looks inside and out and to be honest with you I have been stumped ever since, with the holidays and other crafts taking precedence over bag making, I haven't done any more research or work on creating another flat bottom purse.
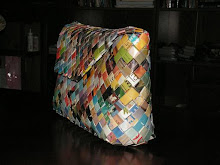
All I can do is post the pictures that I have taken of the process that I came up with to get what I wanted, it's not the "right" way, but it worked, it has some over hang that I tucked in, but I got the results I wanted, even if it's not the proper way to achieve the flat bottom, you are welcome to try it as I have done it, and maybe with some tweaking, you might be able to figure out the correct way to get the design yourself. So, here is the process I took to get the flat bottom purse design.
The first picture here is showing the bottom strips, the center is made with 2 strips of 32 links sewn together, then the right side is 28 links and the left side is 30 links.

Then picture number 2 is what the bottom looked like, I took it before I actually sewed it together, but it IS what it looked like when it was sewn.

This is how it looked as I set the top portion over the bottom just an idea of how much the 2 ends were hanging out,

A better view of just one side of it, how it looks before you tuck it in.
The top section is coils of 70 links long, and the bottom measures 12 inches, so of course adjustments will need to be made to get the size you want.
Since this purse was made, I have come to see it works best if the coil is best made with a number that is divided by 2 and is then an even number, mine were 35 as the half number and an even number is much easier to work with.
The next picture is a top view after I basted the stitches on each edge, leaving the two ends unattached, and the edges hanging out,

The next 2 pictures are close ups of how it looks sewn on the sides with ends unattached.


Then these next 2 are of a close up after I tucked the ends inside.


Here is an inside view of the bottom with the ends tucked in.

This is an inside view of the bottom before I sewed the ends into place.

This is an outside view of the bottom from a side angle.

Here is the bottom view.

I did not continue to take pictures at this point, but I anchored the inside flaps and sewed more rows on, making the last 3 rows just a bit smaller by cutting the paper pieces just a bit smaller to make it tapper a bit, followed by adding a flap on one side, making each row 2 less links until I got the results I have pictured here.


I don't expect any of this to be very helpful unless you have already been to Mylinda's Wrapper Purse tutorial and learned the basic of construction and practiced the folding nd sewing of the bag she gives as a basis of building on. Her link is on the right side bar ---> over there ---> but up higher. I don't know if this will help you in your conquest, but you asked how I did it and this is how.
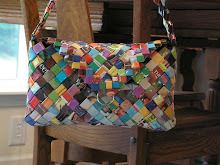
Then there was my brown purse, it is made with much larger links of paper, starting with a dollar bill size pieces. This design had a better result as far as how much excess there was in the edges prior to sewing, I don't think it had anything to do with the size of the pieces, I think I am going to stick to the smaller pieces of paper as Mylinda instructs for future projects, it was faster to use the dollar bill sized paper, but I like the firmer 'fabric' that is obtained by using the smaller paper pieces.
I used 4 bottom rows of 22 links each,[remember this is larger because of the dollar bill sized paper, it will be much smaller if you use these same numbers with the smaller paper pieces] then sewed them together, I then used 60 links length joined, and attached them to the bottom segment, I had success on 2 corners and the other 2 aren't what I want, but it will work, just not perfect. I still had to tuck in one link on each end of one row and sew it closed, leaving a less then perfect square corner.


Here I have completed 5 rows added to the bottom. At this point I started decreasing the size of the links, by gradually making each row from smaller pieces of paper.


My next attempt is going to be to investigate the possibility of not joining the chains into a circle and work in vertical rows that start at the top, come down to form a bottom and then continue on up to the opposite side at the top, and then joining them into one long rectangle, and fitting in a side segment of approximately 4 rows joined together in a smaller rectangle. I am just playing with this option in my mind, if you get around to trying it first go for it, I am sharing these thought with out trying them, there is no guarantee it will work, just my whirling mind at work! If you have any suggestions, thoughts or experience with any of these ideas please share with me, I'd love to cut through some of the experimenting if you have already tried any of these things and it didn't work!!


19 comments:
OH MAN YOUR GOOD I LOVE THEM BUT I AM LOST AT OK YOU..... Hope things are calm there.
thanks, i'm going to try this. my mom has been begging me to make her one and i want to make her one with a flatt bottom. thanks so much. :)
It's a great how to
thanks
is amazing
Oh wow...so cool with the flap. I've never seen one like that. I figured out how to make these myself...kinda the first style with the zippers and woven handle. I made a video on how to do it. It's at my blog: http://makeacandywrapperpurse.blogspot.com/
Now I totally want to try my hand at making one with the flap!
Thank you so much for the tutorial on how to make these handbags. I've seen them around and have been itchy to make one!
hi,
i am search a way of making flat bottom wrapper bag, thanks you help me a lot.
Beautiful...gracias....
Your purses are really pretty! I like the flap.
How did you attach the lining on the second one?
nice bag
What needle do you use to sew them together? How do you sew the rows together?
hello
Great post thanks for sharing a informative article keep it up
Hi
Very nice and intrestingss story.
thanks for this nice post 111213
thanks for this tips
hi, good site very much appreciatted
It was very interesting for me to read the post. Thanx for it. I like such topics and everything that is connected to this matter. I would like to read more soon.
Anete Hakkinen
escort south london
It is a big pleasure to visit your site and to enjoy your exclusive posts here. I like that very much. I can see that you paid much attention for those posts, as all of them make sense and are very useful. Thank you for sharing. I can be very good reader & listener. Appreciate your work!
Dear distant Friend :) After seing this I can call you a Friend even if we never met online before :) Thank you so much for the wonderful material, the explanations and the spirit :)
All the best to you, the cat, and your family, too.
I am now switching from crochet and knitting projects to the wrappers bags/baskets; just a hobby, not selling or anything. But I really love this idea, and try to spread it as much as I can. Hope to see more of this fantastic projects :)
My warmests greetings from a coldish and quite wet at the moment Poland :) Live long and prosper! :)
Yours truly, Stovokor. A friendly Werewolf with a drop of Klingon blood :)
Post a Comment