


Here is a link to HOW TO MAKE PLARN if you don't already have one or know how to do it.
Also, you don't have to use plarn if you want to make it with regular yarn, I would suggest bulky or chunky weight to get similar results or doubling up on worsted will give you a larger purse if you hold the two strands together or you could even use one strand with a smaller hook, I want to make one with wool and felt it, but I haven't got any wool right now that will work, if you want to do that, let your own tastes dictate what you choose to use.
------------------------------------------------------------------
Recycled Purseability Purse Pattern
Materials:
Plastic bag yarn, strips cut to 3 cm width approx. 1 1/8”
wide
Size J crochet hook this will create a nice dense fabric
All stitches are Half Double Crochet [HDC]unless other wise
noted
To create the decreases over 2 stitches, insert hook and
pull up loop twice, then through all 3 loops in other words
don’t YO as a regular HDC stitch.
The base is worked by joining each row with a slip stitch
then the body is worked in the round, I will point out when
to change and when to begin using a pin, stitch marker or
scrap of yarn to mark beginning of each row.
You will achieve best results if you stretch and shape the
plastic fabric as you go.
Row 1:
Chain 21
Work 2 HDC in second chain from hook.
Work HDC stitches across 18 stitches.
Work 3 HDC in next stitch, turn work to continue working the
opposite side of unworked part of the chain.
Work 18 HDC stitches.
Work 1 HDC in space where first 2 HDC’s were worked, Making
sure you skip over the chain one of beginning of round, join
with a slip stitch in top of first HDC worked. [42 stitches
total]
Row 2:
Chain 1, work 2 HDC in same stitch as joining slip st.
work 2 HDC in next stitch.
Work 19 HDC’s
work 2 HDC’s in each of next 2 stitches.
work 19 stitches , join with a slip stitch to first stitch
worked.
[46 stitches total]
Row 3:
Chain 1, Work 2 HDC’s in same stitch as joining Slip St.
*[Work 1 HDC in next stitch, work 2 HDC for an increase in
next stitch] repeat work between [ ]'s once more. *
Work 18 stitches, work 2 HDC in next stitch, repeat from *
to * once.
Work remaining 18 stitches, join with a slip stitch to
first st.
[52 stitches total]
Row 4:
Chain 1, Work 1 HDC in same stitch as joining slip stitch.
*Work 2 HDC’s in second stitch, [work 1 HDC in next
stitch, then 2 HDC’s in following stitch] repeat the work
between the [ ]'s 3 times total*
Work 19 HDC
Repeat from * to * work last 18 stitches, join with a slip
st. to first st. [60 stitches total]
Row 5:
This row will be worked as Single Crochet Stitches using
the back loop only, to form a base ridge.
Chain 1, Work 1 stitch in same stitch as joining slip
stitch.
*2 SC in next stitch, [work 1 stitch in each of next 2
stitches, 2 SC in next stitch] repeat the work between the
[ ]'s 3 times total*
Work 20 SC remember, back loops only
Repeat from * to *
work 19 SC join with slip stitch. [68 stitches total]
Row 6: This is the last increase row, and where you begin
working in the round also where you will need to begin
using a marking on the first stitch of each round.
Chain 1, work 1 HDC in each of next 2 stitches. [placing
marker in first stitch.] *Work 2 HDC in next stitch. [work
1 HDC in each of next 2 stitches, Work 2 stitches for an
increase in next stitch.] repeat work between [ ]'s 3
times more for a total of 5 increases*
Work 21 HDC stitches, repeat from * to *
Work last 19 stitches. Do NOT join, do not chain one. The
end stitch will be off center, and should be.
[78 stitches total]
Row 7 - 11: Work these 5 rows evenly in HDC
Moving pin or marker at beginning of each row. [Making sure
to keep your marking in the very first stitch of each round,
if you forget and try to move it later, it will effect the
stitch count at the finishing.] Your beginning stitch for
the round will gradually move right, and it’s suppose to.
Row 12:
Work a decrease in the first 2 stitches [decrease as stated
above]
work 22 HDC crochets, Work a decrease
Work 13 stitches, Decrease once
Work 22 stitches, Decrease once
Work 13 stitches. [74 stitches total]
Row 13:
Reminder to keep the first stitch in each new row marked
with pin or contrasting yarn.
Work all stitches evenly in Half Double Crochet stitch, [74
stitches]
Row 14:
Work 5 stitches, Decrease once
Work 10 stitches, Decrease once
Work 23 stitches, Decrease once
Work 10 stitches, Decrease once
Work 18 stitches. [70 stitches total]
Row 15:
Work all stitches even. [70 stitches]
Row 16:
Work 11 stitches. Decrease once
Work 33 stitches, Decrease once
work 22 stitches. [68 stitches total]
Row 17:
Work 5 stitches. Decrease once
Work 10 stitches. Decrease once
Work 20 stitches. Decrease once
Work 10 stitches. Decrease once
Work 15 stitches. [64 stitches total]
Row 18:
Work one row even
Row 19:
Work 4 stitches. Decrease once
Work 12 stitches. Decrease once
Work 16 stitches. Decrease one
work 12 stitches. Decrease once
Work 12 stitches [60 stitches total]
Row 20 and 21:
Work 2 rows even
Row 22:
Work a decrease in first 2 stitches
Work 20 stitches. Decrease once
Work 6 stitches. Decrease once
Work 20 stitches. Decrease one
Work remaining 6 stitches [56 stitches total]
Row 23:
Work one row evenly.
This is the end of the body of the bag, it will be uneven
looking, but it will even out in the next step.
Keeping pin or marker in place, for ease in following
which side I am explaining, work "SINGLE"
crochets in the next 8 stitches, chain 1, in next stitch switch back to HDC, work
6 stitches, chain one and turn. [These 6 stitches SHOULD be
on the half way mark of the bag and will form the handle if
they do not align correctly, adjust so they are centered, this is
where error can be from not keeping the first stitch marked
properly.]
work 6 Single Crochets [use SINGLE Crochet on all inside
rows, the inside row being the side that will be against your body, the outside row is what is visible.] Chain 1, turn
Work 1 HDC, decreases Twice, work 1 HDC Chain 1 and turn
Work 4 Single crochets, chain 1 and turn.
Work 1 HDC, decrease once, work last HDC stitch, chain 1 and
turn.
Work 3 SC, chain 1, turn
Work 1 decrease using stitches 1 and 2, then work another
decrease using stitches 2 and 3, chain 1 and turn.
Work 2 SC chain 1 and turn
Decrease once, chain 1 and turn
Work 1 SC, chain 1 and turn the “right side out, facing
you.
slip hook into base of stitch just worked, pull up yarn, then slip through
stitch and through the ch 1 on hook.
Chain 20 to 28 stitches, depending on length
of handle you will want. [keep in mind, this will be half
the length]
In second chain from hook, work SC down length of the chain
and continue SC down handle base and across the 22 stitches
of the body of the purse to the opposite side of bag. [the
pin should be facing you as you work down the length of the
chain for the handle.]
Repeat handle base formation and chain length for handle,
making sure the side with out the pin is facing you, work
down the chain and handle base in SC stitch. continue SC
across the 22 stitches of the body of the purse, that have
not been previously worked, and that are now facing you
that HAVE the pin or marker in it. Continue back up the
first handle section working on the opposite side of chain
with SC stitches.
When you reach the end of this chain, break yarn, thread a darning needle and sew the 2 handle pieces together, making sure the 2 "finished" edges match. [I break the yarn leaving a loop on the working end, so the ball of yarn can then be reattched with out a knot by removing the broken yarn and start with a whole loop. Reattaching in the same manner as when you looped them together to make the yarn.]
work SC stitches down the last remaining side of handle that is
unworked, continue down the base of the handle and work 2
slip stitches at handle base to join to the stitches of the
body side with out pin.
At this point the handle is done and can be tucked into the
body of the purse to keep it out of the way as you work the
flap.
Chain 1 then work 18 SC across the body of the bag, [these 18 stitches should be centered between the handle bases.] Chain 1 turn [when right side of purse flap faces you, use HDC crochet stitches, when inside of flap faces you use SC
stitches, this technique will eliminate the bars showing on
the front that would show if you use only HDC throughout]
Work 18 HDC, chain 1 turn work 18 SC, chain 1 turn, repeat
these 2 rows 5 times total.
Next row Work 1 HDC, decrease once, work 12, decrease, work
1 HDC chain 1 turn work SC across. Chain 1 turn.
Repeat decrease row above, but working 10 stitches between
the decrease stitches, chain 1 turn work SC across. Chain 1
turn.
Repeat decrease row, working 8 stitches between the 2
decreases, break off yarn.
Turn purse so the side with the pin is facing you, the flap
is closed and down, on the left side of the base of the
flap, reattach yarn. [You will then open the flap and
turn the purse to continue. I only explain so you are sure
to reattach the yarn to the correct side] and work SC down
side, ***IMPORTANT! [Skip a space between the sides and
bottom edges to create a rounded edge, or work 3 in the
first and last stitch of the bottom edge for squared
corners on the flap.]***
continue SC across the 12 stitches of the bottom edge and
up remaining side.
Work reverse SC stitch back down and
OVER the SC stitches just worked, break off yarn and work
in ends. The purse is now done, and can be lined, if you
choose to, I usually add a sturdy bottom too, before I line
it. For variation, the reverse SC stitch can be worked on
both sides of the handle as well. Another option is to
eliminate the flap and use a zipper or Velcro as a closure.
Now that your purse is finished, SHAPE it, just like when
you crochet or knit with yarn to get the best appearance of
your finished project you have to block it, no water,
blocking board or pins required, just stretch and shape the
plastic so it takes the shape it's intended to have.
ENJOY!
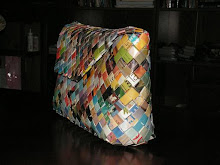
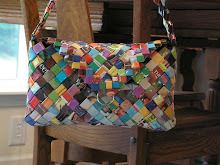
All of these purses are made from recycled materials.
Most are crocheted out of plastic grocery store shopping bags, but some are woven from magazines, junk mail or chip and candy wrappers.


6 comments:
Hi Nan,
I will have to ENJOY looking at your creations until my crochet demon is gone! I do not fully understand how to crochet right to left (?) and back again and still have the same number of loops etc. Your bags are so very good!
Thanks for the excellent pattern!! I'm not sure I'll make a PLARN one, but you never know!!!
Boy!! Your Mom should see THIS!! Looks like a lot of "WORK" to me! :)
Busy, busy, busy!
Hey...Where do you get pink bags??
The pink bags came from Dress Barn, don't know if they still use pink or not, it's been awhile. I had a friend who worked there and saved them for me when ever she had a return or exchange, it was store policy to throw out the bag that they brought the exchange in and use a fresh bag for the new purchase. Her co-workers got into the act and they all started saving them for me a few years ago.
I don't hear from this friend any longer, since our move and have just finished using up the rest of my stash of pink bags on this last purse.
I just love this purse! It's such a classy looking item and a bonus is that it's made from recycled materials. I'm going to try and do the pattern in wool like you suggested. How big is the purse as you made it? I'd love to make this in wool and felt it. Any idea about how much yarn I need? Thanks so much for making the pattern available for free.
Cindy
What a great pattern! Thanks for sharing it, Nan.
Post a Comment